
 Hot Topics
- Exclusive Model
- 3D Print Showcase
- Answer To Win
- Travel Prints
- Wishlist Challenge
- My Print Corner
- Print For Dad
- Challenge
- Print Hacks
- Maker Challenge
- My 3D Print Journey
- Print And Play
- Lucky Draw
- Pop Culture 3D
- Wish List
- Share Your Tips
- Reward System Upgrade
- Work In Progress
- Points Accelerator Card Application
- AC Color Lab
- Rewards Accelerator Card
- Gift Wishes
- Weekly Featured Model Reward
- 🎁 Anycubic Creative Kit
- Print Profile Player Board
- Suggestions for Makeronline improvement
- Suggestions for AC Slicer & Photon workshop & APP
- 3DCanvas

Manethon_Sega
@Manethon_Sega_3814903
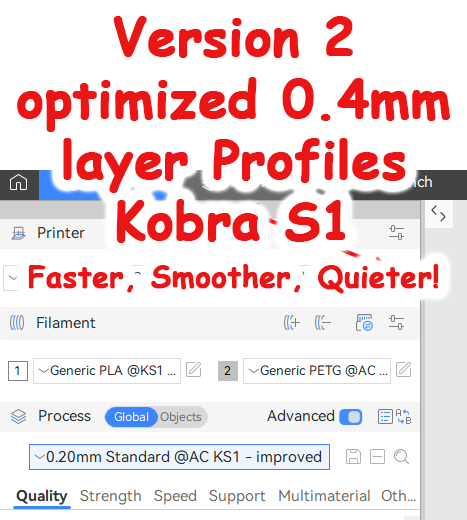
optimized 0.4mm Profiles for Kobra S1 - Faster, Smoother, Quieter!
#Weekly Featured Model Reward#
Hey Kobra S1 Slicing Ninjas! 🥷
Remember those 0.4mm profiles? Well, they just got a major upgrade! Thanks to your awesome feedback from Makeronline and Reddit and countless hours staring at plastic spaghetti (just kidding... mostly!), Version 2 is officially rolling out. Because why settle for good when you can have awesome? (cough Anycubic, take notes! 😉).
So, what shiny new goodies are in V2?
- Speed AND Beauty: I've magically tweaked things for even better surface quality without sacrificing those sweet, sweet print times. 🚀
- Vase Mode Ready: Yep, these layer profiles are now calibrated to work beautifully for those elegant single-wall vase mode prints too! 🏺
- Ninja Mode Activated: Added a super quiet 0.2mm layer height profile for those late-night print sessions when you don't want to wake the neighbors (or the dog!). 🤫
- Stringing Be Gone (Mostly!): New filament profiles specifically tackle stringing issues! We tested multiple brands, battling those pesky plastic hairs so you don't have to. ⚔️
- Filament Fiesta: Added fresh generic profiles for:
- PETG High Speed (For when you really need that PETG part yesterday)
- PETG Normal (The reliable workhorse)
- PLA+ (A bit faster, a bit fancier)
- PLA Normal (The classic, dependable PLA)
- Steel Core Upgrade: Bonus profile added for you tough guys using 0.4mm hardened steel nozzles. 💪
- Cool Under Pressure: Auxiliary and chamber fans now automatically activate when needed – keeping things chill! 🌬️
Choose Your Layer Adventure! (Remember: thicker layers = stronger parts, usually!) HQ = High Quality, Sd = Standard, Quit-HQ = Quiet High Quality. (I have calibrated the new layers settings and speed to work with Anycubic standard nozzle profile, and streamlined the changes to be mainly in the layers and the filament by using the settings override. I have Just added the Steel nozzle profile because it wasn´t available.)
- 0.08mm HQ (optimized for the best possible quality)
- 0.08mm Optimal (optimized for speed while having a good quality)
- 0.12mm Optimal (optimized for speed while having a good quality)
- 0.12mm HQ (optimized for the best possible quality)
- 0.16mm HQ (optimized for the best possible quality)
- 0.16mm Optimal (optimized for speed while having a good quality)
- 0.2mm Sd (optimized for speed while having a good)
- 0.2mm Quit-HQ (slower and quitter printing)
- 0.24mm Draft (optimized for speed while having a good quality)
- 0.28mm Extra Draft (optimized for speed while having a good quality)
Ready to Upgrade?
These profiles are saved as user pre-sets in the .3mf file.
To add them to Anycubic Slicer Next / Orca Slicer, just follow the picture guide (and yes, open the file first! 😆):
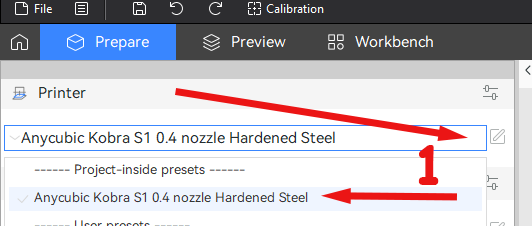
1- click on printer edit icon (it will open a new window - don't panic 😜)
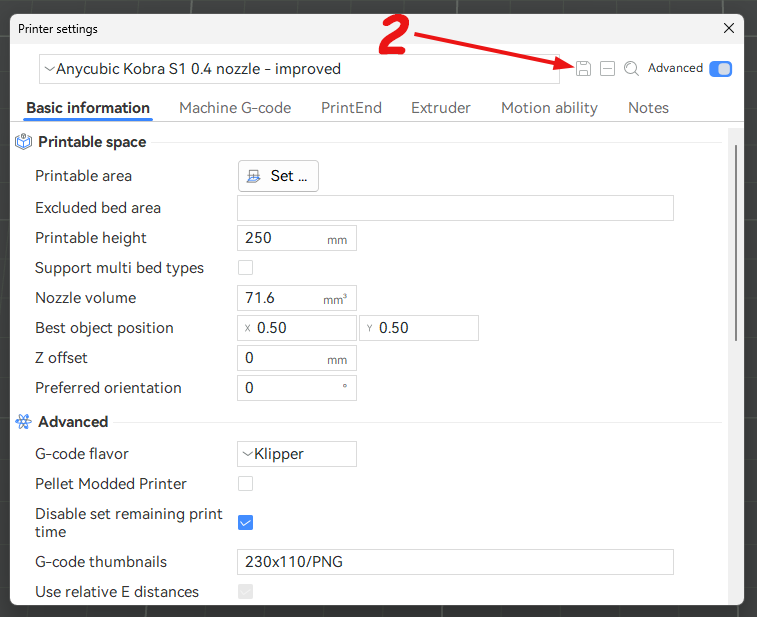
2- click on the printer profile save icon (a smaller window will open - please stop panicking😆)
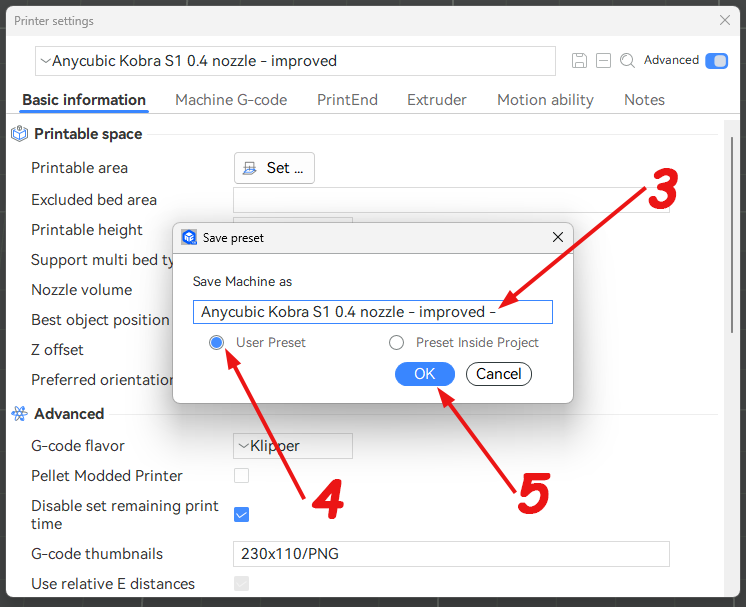
3- add a dash (-) at the name end. (Adding a dash ensures the profile names are unique and won't overwrite any existing default profiles)
4- click on user preset.
5- Finally click on OK button (good job - we are half way there)
Now close the Printer settings window.
6- From the process dropdown list choose the layer profile you need
7- click on the process save icon (Yes, a smaller window will open).
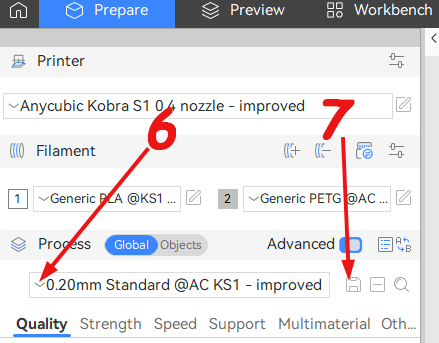
8- add a dash (-) at the name end (sounds repeated, I know 🤓).
9- click on user preset.
10- Finally click on OK button.
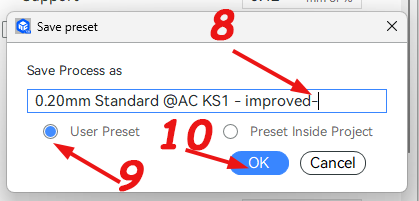
11- If you want to save other layer height profiles, repeat steps 6 through 10 for each one.
Horray, now you have the new nozzle profile and its layer settings, and you are ready to go. Have fun.
Feedback:
Let me know how V2 works for you! What awesome stuff are you printing? Any suggestions? Drop 'em in the comments below!
Disclaimer: These profiles are provided as-is and have been tested on my Kobra S1. Your results may vary depending on your specific filament, and environmental conditions. Always supervise your prints, especially when using new settings.
P.S. No actual profiles were harmed in the making of this update... maybe just a few Benchies sacrificed to the printing gods.
2025-03-27 21:14
3.2k
9
15


All Comments
(15)
Emoji
Picture
(
0
/
5000 )

bubut
@bubut_4731352
2026-02-19 17:34
0
1
Manethon_Sega
@Manethon_Sega_3814903
2026-02-19 21:07
0
0

Scott
@Kickazz006_4821915
2025-10-30 12:16
0
0
jdubglass
@jdubglass_3342016
2025-07-04 03:50
0
0
Zymex
@Zymex_622723
2025-05-09 15:51
0
0
Yez
@Yez70_1783148
2025-04-26 04:19
1
0
View More Comments >
 Hot Activities
Customer Support
Anycubic WIKI
Community Guidelines
Campaign Guide